Why is there a bag of screws in the box with new skates?

Those brand new skates have finally been delivered! The box is opened excitedly, and as the skates are pulled out of their tissue paper cradle, a small plastic bag of screws falls out and hits the floor. What are they for, and should they be used? Somewhat remarkably, new skates seem to come with a distinct lack of clear instructions, so in this article let’s look at what those screws are for, because as it turns out they are important!

How Are The Blades Attached To The Boot?

There are two main ways in which blades are attached to figure skating boots (screwed or riveted), and four ways they’re most likely to be purchased (riveted, fully pre-mounted blade, partially pre-mounted blade, separate boot and blade).

Low Price Skates / Rivets

Boots towards the low end of each manufacturer’s product range may well have a blade which has been permanently riveted to the boot. The blade therefore can not be removed, but should also be pretty secure as a result.

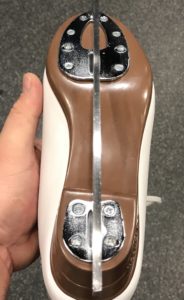
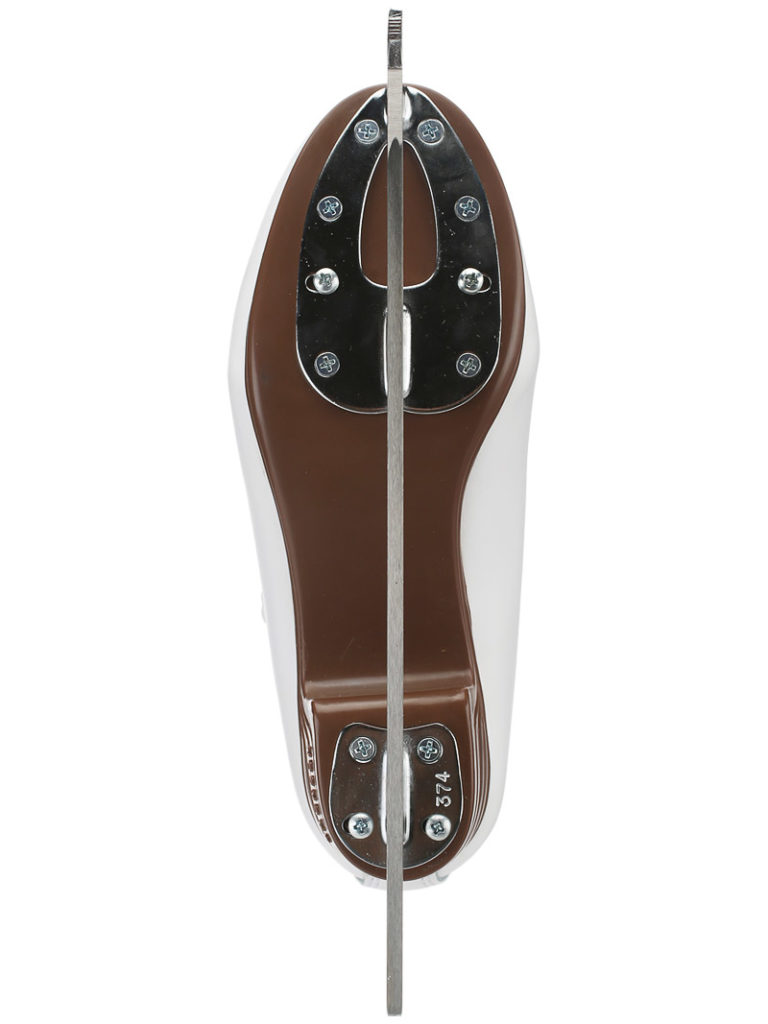
Jackson Softec Tri-Grip Sole (image from Ice Warehouse)

It is in theory possible on some boots to drill out the rivets and re-mount the blade if necessary, but that’s very much an “At Your Own Risk” kind of task. Beyond that, the good news is that if you bought skates with riveted blades, in all likelihood there’s nothing you need to do, and there would not have been a bag of screws in the box.

Low to Mid-Range Skates / Fully Screwed

Some skates are delivered with the blade fully attached using screws.

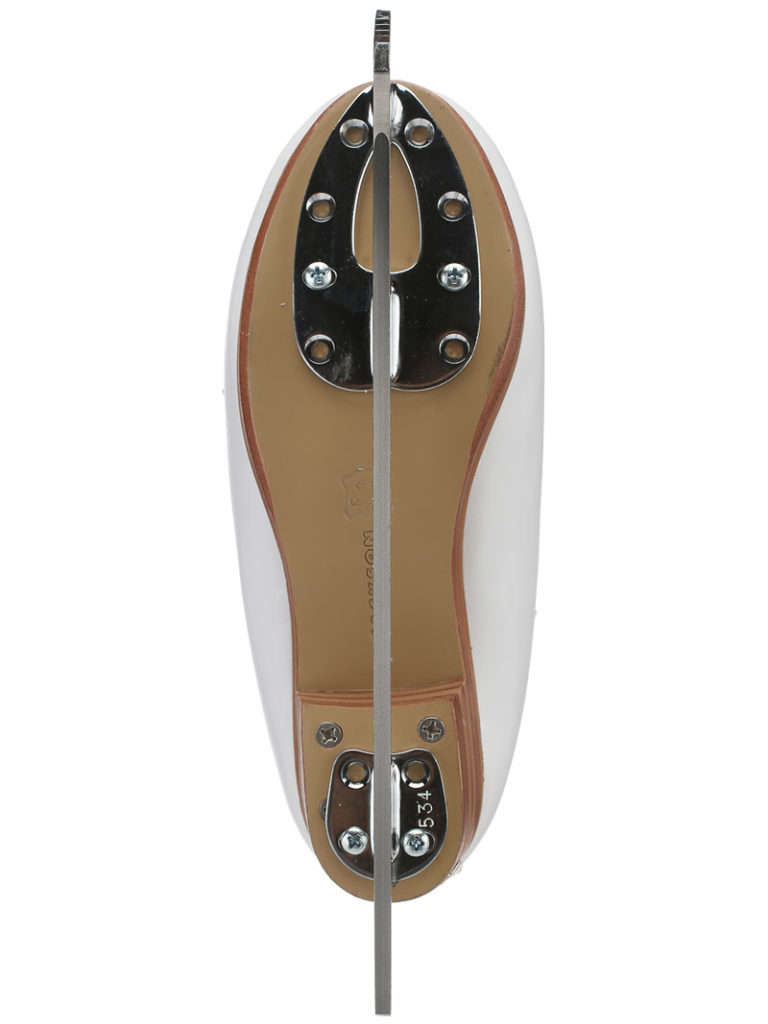
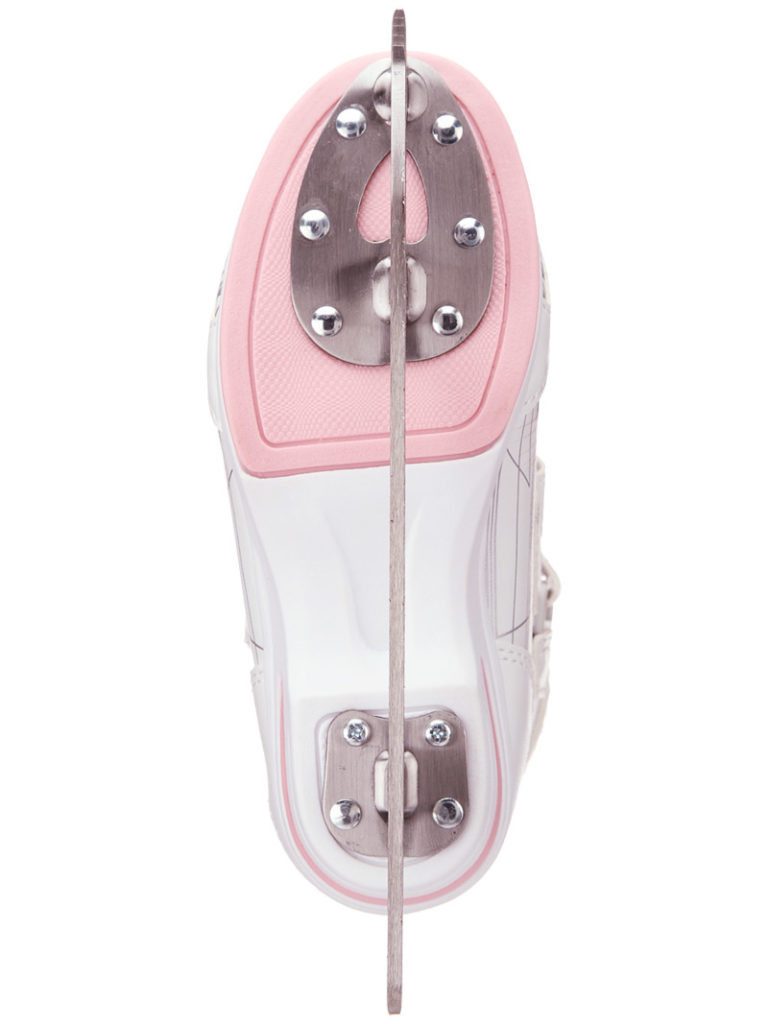
Jackson Classique Sole

For example, the Jackson Ultima Classique skate (which my youngest child has) comes with a Jackson Mirage blade screwed to the sole. This may come as a surprise to anybody looking at this skate, because there are two types of screw on it (one is countersunk, and one is a flat head). However, the skate images on Ice Warehouse confirm that this is indeed how they come from the factory:

Jackson Classique (image from Ice Warehouse)

This skate model comes with no bag of screws because all the screws have been put in at the factory. As such there is only one task needed:

  1. Periodically check the screws; screws can come loose and eventually they can drop out. As somebody who has had a skate blade detach as I took a step, I can offer my assurance that even if the skate itself doesn’t sustain any additional damage, the fall for the skater isn’t pleasant. I ask the skate technician to double check the screws each time I get the blades sharpened.

Mid Range Skates / Partially Screwed

A mid-range figure skate such as the Jackson Ultima Freestyle (which my middle child had) is typically purchased as a bundle, with the blade coming pre-mounted and ready for use.  Or rather, mostly ready for use, as evidenced by the little baggy of screws that hides inside the box. Again, an image from Ice Warehouse confirms how the Freestyle would look on delivery:

Jackson Freestyle (image from Ice Warehouse)

The blade will be factory-mounted in the most common alignment (intended to work well for most people) with – in this case – just four screws, and there may be a further ten or so screw holes left empty and, coincidentally, there will be around ten screws in the plastic bag. The lack of direction with regard to the screws may be a little worrying, so here’s the deal:

    1. It’s ok to skate on the blades exactly as they come from the factory for a few weeks. However, the boots must not be used for jumps; jumps put a lot of pressure on the blade mount, and as delivered, the blade would likely rip out of the sole as the skater lands. Use this skating time to determine whether the blade mounting position works for the skater or if it needs to be realigned (something usually best determined in conjunction with a coach or a skate tech). Once ready to commit to the blade alignment, continue to step 2.


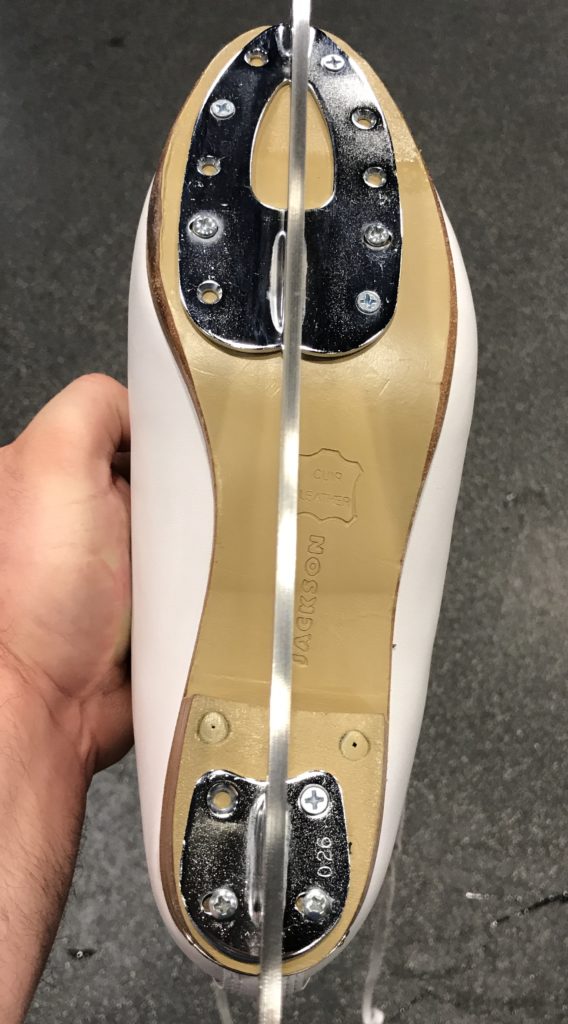
  1. Don’t grab a screwdriver and put all the screws in. This is really important, because the screws are being driven into (typically leather) soles. The screw threading can strip over time or the soles can rot if left damp, causing the screw to drop out and leaving behind a hole to which a new screw would not grip. The idea is to add about half the screws, leaving at least one unused screw hole at the back, and three to five at the front. That way, there will always be fresh leather to screw into should it be needed. As to which holes to use, and how much to tighten the screws,  I have left that decision to my skate technician. I am too scared of ruining an expensive pair of skates by not knowing what I am doing! I’m sure that there are other sites which offer guidance on this subject, but I’m going to play safe and leave it to a professional. Here are my middle child’s Freestyles after having the blade screwed on:

Jackson Freestyle Sole

  1. Periodically check the screws!

Boots Only / No Screws

If you’re (un?)fortunate enough to be buying skates at a level where they come without a blade attached (which usually means higher, or competitive, level skates), strangely enough there may be no screws in the box with the skates; instead the blades usually come with screws.

In terms of steps to take, my recommendation is to mount the blades (tip: get your skate tech to mount the blades) using just  four screws just as on the Freestyle boots above, then go and test the skates on the ice. At that point, follow the steps for Partially Screwed skates to complete the process.

Edea Boots

If you have Edea boots, please be aware that Edea sells special screws designed for the thinner soles on their boots, which means really only the Edea screws should be used. Edea also recommends that the screws are installed by an authorized dealer who will have their special mounting rig; some skate technicians may disagree, so that decision is going to be up to the individual.

Do It Yourself?

The obvious question, especially if one is impatient to get on the ice, is “can I do this myself?” Of course! It’s just a question of confidence and care. I know that plenty of people are happy aligning a blade, marking the hole locations, notching with an awl, then pre-drilling the hole before mounting the blade itself. Personally I’d rather leave that to people with more experience than me, but that’s my personal choice. 

Whether you choose to use a skate tech or attach the blades yourself, I hope this has been useful in explaining what to do with the screws and why.
Making Sense of Figure Skate Blade Profiles

Blade profiles is one of those subjects to which entire web sites could be dedicated and somebody would still find something that wasn’t covered adequately, or a case where something didn’t apply. Nonetheless, it’s useful to understand what’s being talked about when there’s a reference to blade profiles and rocker radius (sometimes written as Radius of Rocker, or RoR in a similar way to Radius of Hollow (ROH)). Hopefully I can make some sense of the topic without getting too dragged down into the many, many variables involved.

Figure Skate Blade Profiles

Blade Profiles

The phrase blade profile refers to the shape of the blade surface (that is, the bit that touches the ice) as viewed from the side. I’m only one sentence in, but I already have to add a caveat that some manufacturers have also created products which change the profile of the width of the blade along its length (for example, John Wilson Parabolic blades, or some of the tapered blades which are thicker at the front and narrower at the back). For the purposes of this page however, we will ignore this complication and concentrate on the side profile of the blade.

Unsurprisingly there is no “one size fits all” for blade shapes, and over the years manufacturers have experimented with different curves and toe pick designs with varying degrees of success. In the end, though, many current blades seem to try to emulate some classic John Wilson blade designs such as the Gold Seal and Pattern 99, which are ubiquitous competition-level blades.

Anatomy Of A Blade

Figure skate blades are made up of three main functional sections, and understanding what each part of the blade does will help with the further explanations below.

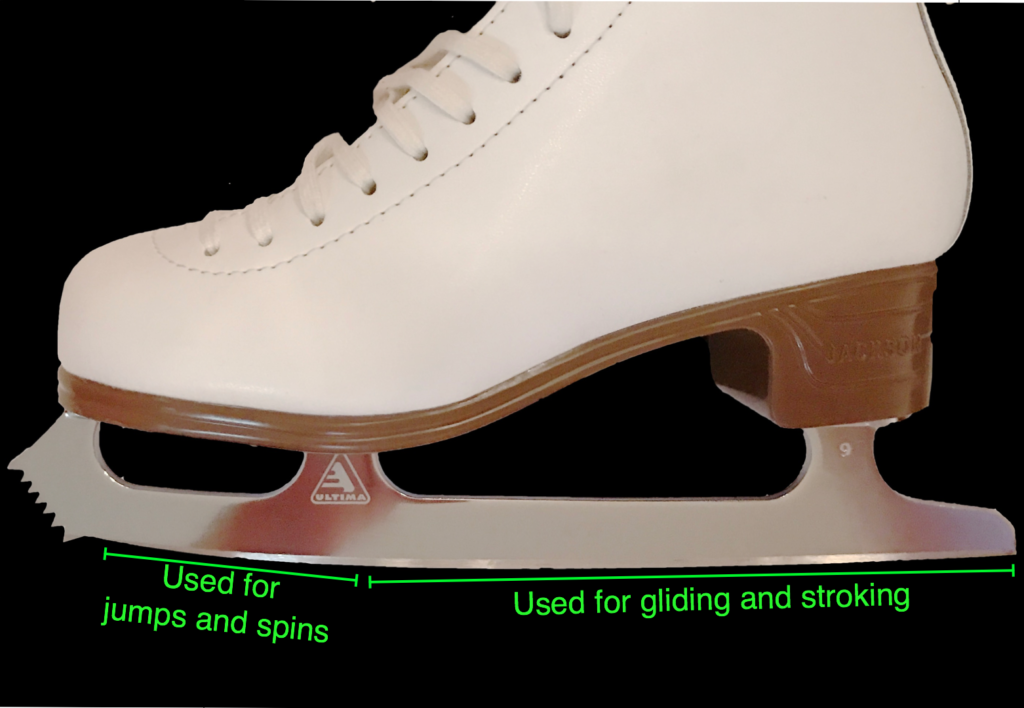
Figure Skate Blade Areas

The diagram above shows the two parts of the blade which are used for movement; the third part are the toe picks on the front. I am, by the way, ignoring the lethal weapons (toe picks) on the front of the blade for the moment. While they—and their relationship to the blade—are important, they won’t help this discussion any.

It’s important to understand that the two labeled parts of the blade are used for different moves. When gliding or stroking on the ice, the skater uses the rear part of the skate (the rocker). When performing jumps and spins, however, the skater moves their weight forward to use the front part of the blade (sometimes called the “spin rocker”). This is why the tapered blades I mentioned above are thicker at the front; to support the jumps and spins.

Rocker Radius

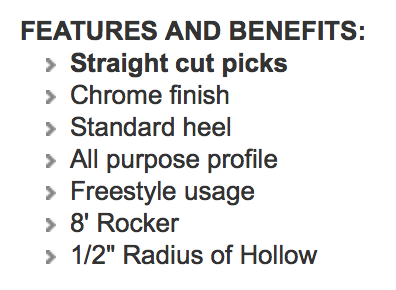
The shape of the blade profile for figure skates is usually quoted in feet, and as with Radius of Hollow, the idea is that if one were to draw a circle with that radius, the shape of the bottom of the blade would follow an arc of that circle. If that’s confusing—and it probably is—let’s make it clearer by using my daughter’s Jackson skates as an example. Her skates have the Mirage blade on them, and Jackson’s website has this specification:

Jackson Mirage Blade Specification

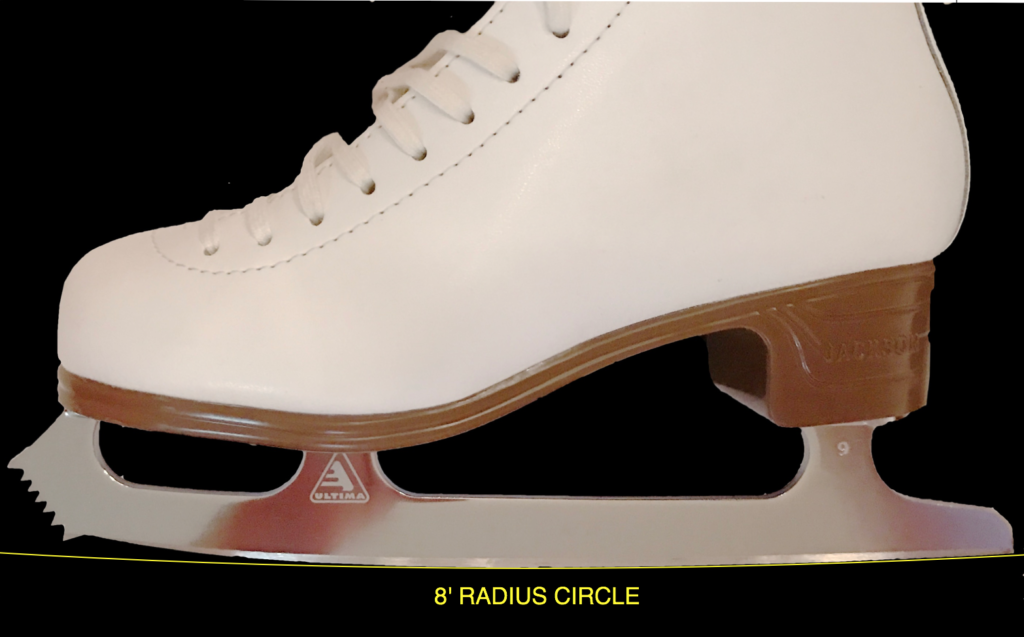
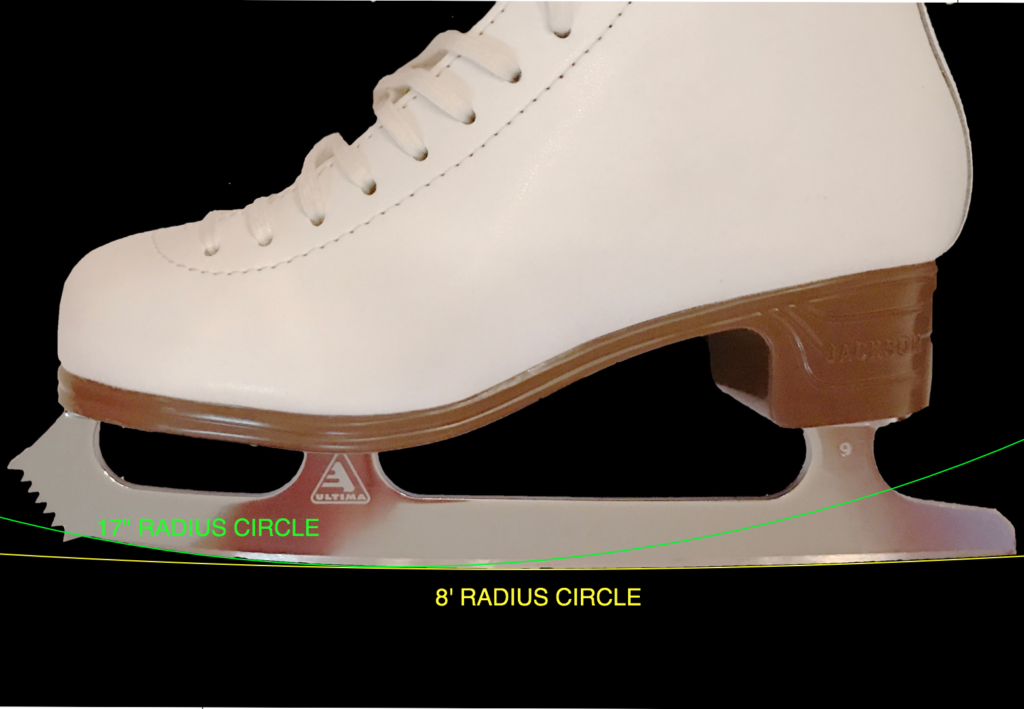
Based on the information above, the Mirage has an 8′ rocker radius. To illustrate this, I took the skate image into a drawing program and scaled it to represent its actual measured size. I then created an 8′ radius (16′ diameter) circle and overlaid it so that the circle’s arc could be matched against the blade. This is the result, and the thin yellow line is a small arc from that huge circle:

Blade showing 8' radius profile

What should be obvious here is that while much of the blade aligns with the stated rocker radius, not all of it does. The rocker radius really refers to the rear part of the blade that’s used for gliding and stroking. The section of the blade used for jumps and spins is clearly not using a circle of the same radius.

What difference does the rocker radius make? Well, a larger radius means a flatter blade, which means more of the blade will contact the ice at any one time. This may make the blades feel a little more stable, although they may be marginally less maneuverable on the ice. Conversely a smaller radius means a smaller contact area, and skaters seem to report more instability especially if they were used to a larger radius rocker previously. Choosing an appropriate rocker radius is definitely an area where talking to your skate tech and coach is important. However, as you’ll see below, the rocker radius alone does not define everything about the blade’s behavior.

Two and Three Radius Blades

Figure skating blades do not in fact use a single radius, despite that being what’s quoted on the literature; they typically use two or even three radiuses along the blade. The largest radius is reserved for the rear section, and the front jump/spin section will normally be cut either from one other radius, or split into cuts along two different radius arcs. Looking at the Jackson Mirage blade again, the front section appears to be cut using somewhere around a 17″ radius. I have overlaid a green circle on the previous image demonstrating this much sharper arc as seen at the front of the skate:

Two Radius Blade Profile

It’s interesting to me that the only radius quoted for almost every blade is the main rocker radius rather than the front radius (or radiuses), because it seems to me that for a figure skater the properties of the area on which they perform jumps and spins might be far more important to them, or at least might have more impact on the skating performance. Maybe I’m wrong. What do you think?

Accuracy of Sharpening

Given that the exact curvature of each make and model of blade are part of the blade’s characteristics, finding a skate tech / blade sharpener who can accurately and consistently grind the right profile on to the blades is really important. In fact, this will probably become a recurring theme on this blog when it comes to skate maintenance: find a great skate tech (word of mouth is usually a good way), make friends with them, grab hold of them and never let go! You need to be able to trust that when your skates are sharpened, they’re going to come back correctly sharpened, the same way, every time. The corollary to this is that taking your skates to be sharpened by a different person or at a different place each time is a bad idea.

Hopefully if this was previously a confusing topic, this helped shed some light on the subject.

Ice Skates in Transit Need Protection Too!

In a previous post, I explained how to prepare skates for transit after use (using soakers) so that the blades won’t get rusty. In another, I discussed the use of boot covers as an effective way of protecting the boot from damage while it’s on the ice. But once the skates go into a bag, how can we stop them from scratching each other up as they bang up against each other, and everything else kept in a typical skater’s bag? This post looks at ways to give ice skates protection while in the bag.

Towel

Protection For Ice Skates

Bag Choice

The first thing to consider is whether you have, or can select, a bag which isolates the skates from everything else and preferably from each other. I will discuss bags more in a separate post, but it’s something to consider when evaluating options.

However, assuming that you already have a bag or it’s not possible to find a bag which keeps the skates separate, what can be done?

Towels

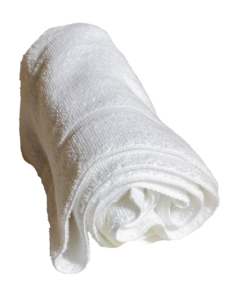
Cheap, cheerful, effective. Wrap your skates in towels when you’re done and you have a four-way win, even if, perhaps, it looks a little amateurish:

  1. The towel helps to keep the boot uppers dry;
  2. You can stuff some of the towel into the boot itself to help draw out the inevitable moisture left there by the sweaty feet which so recently inhabited the space;
  3. Wrapping the boots in towels gives protection them from rubbing against anything other than the towel in transit, thus helping to keep your skate boots in pristine condition;
  4. The towels act as padding against knocks and bangs, so offers some protection from external harm.

By the way: amateurish, smamateurish. I do not care if somebody thinks I look silly using a towel. If it works and doesn’t have any obvious down sides, why knock it? Sure, buy a towel with an ice skate embroidered into it if you like and if it feels more like something a serious skater might use, but otherwise I would look to grab a couple of plain white towels and put them to good use.

The one negative I can see for towels is that they are somewhat bulky, so will take up space in the skate bag which may be needed for something else. That’s a judgement call for each person.

As a side note, I live in constant fear of heavily colored items leaving dye stains on the lovely white skate boots, and in some cases if you believe the reviews on Amazon and elsewhere, I am right to worry about everything from boot covers to bags and more. Buying / using white towels avoids the whole issue.

Pillowcases

If you thought the towels looked silly, try using a couple of old pillowcases. Pillowcases are not as absorbent as towels, so don’t have as much benefit in terms of keeping the boots moisture free (or accelerating the drying process), but most people will be able to find a couple of old pillowcases, and once the skates have been dried off and have soakers on, it’s quick and easy to put each one in its own pillowcase before putting them into the bag.

One thing in favor of pillowcases is that they are very compact; they take up almost no space over and above the volume of the skates themselves.

Pillowcases primarily protect the boots from one another; since they are not as padded as towels, they offer less cushioning against impacts, but using pillowcases is definitely better than using nothing.

Special Skate Pouches / Bags

I’ve read somewhere (though I forget where now) that you can buy special soft lined pouches in which to put ice skates. When I looked for these online, however, I came up with nothing. Maybe there’s a particular name for them which, if I knew it, would magically generate results. Anyway, I mention them only because somebody said they existed. If you know about them and can point me to a link to some, I’d be delighted to update this post with the information you share!

Any Other Ideas?

If you do something different to protect your skates and are willing to share, could you please comment below so I can share it with others here too?

Conclusions

Towels are looking really good right now, aren’t they? With that said, I see many skaters who do not bag or wrap their skates up at all. Currently, the bags my children use have a section on the outside and they can put one skate in each pocket with nothing else in there. However, I’m seriously considering those towels…!

Blades: Radius Of Hollow (ROH)

Skate Blade Hollow

Ice skating blade descriptions often feature a specification called Radius Of Hollow (ROH). Ever wondered what it is?

Radius Of Hollow

When blades are manufactured (or sharpened), part of the decision to be made is what ROH to cut into the blade. Typical values for ROH might be between ¼” and 1½”, but more commonly for figure skates you’ll see values from 5/8″ to 7/16″. But what does this all mean?

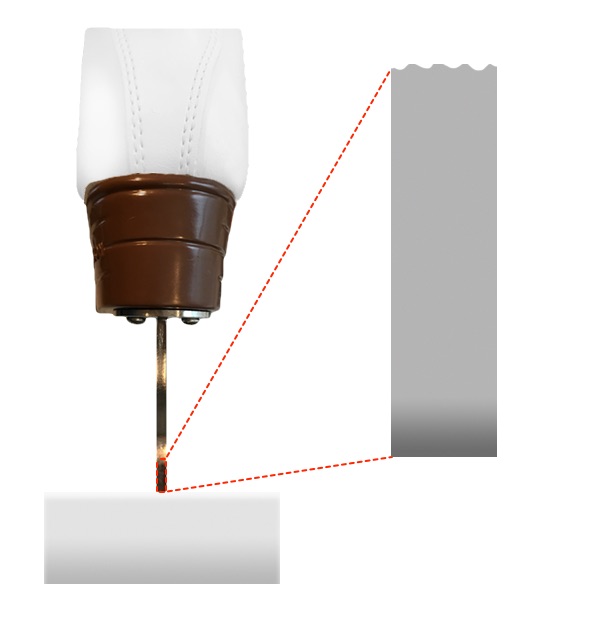
Somebody who has never looked closely at an ice skating blade might have assumed that the blade surface (the part that is skated on) is flat, so looking at the blade end-on (rather than side-on), one might assume it looks like this:

Skate Blade - Flat ROH

In an ideal world, a perfect skater could (would?) use flat blades. The disadvantages of the flat blade though are that unless the skater were always 100% perfect in their movements, they would likely fall regularly, especially after jumps. Using a non-flat blade surface helps us get better grip and control on the ice, and since we are all terribly imperfect, that’s the norm.

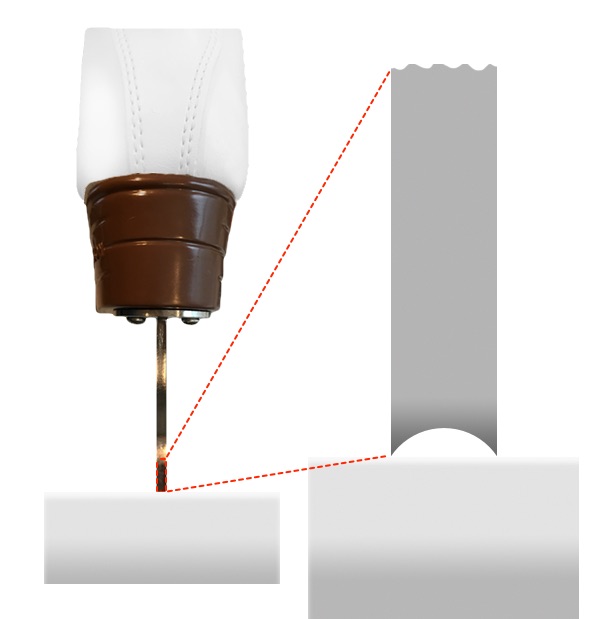
With that in mind, the blade is ground (sharpened) using a curve, creating a kind of arch shape over the ice. This means that the blade actually touches the ice on two rather sharp edges:

Skate Blade Hollow

The arch creates an empty space between the blade and the ice, and this is what is being referred to as the hollow in Radius of Hollow. As for the radius part, you probably know that a radius is the length from the center of a circle to the outside (i.e. it’s half the diameter, or distance from side to side).

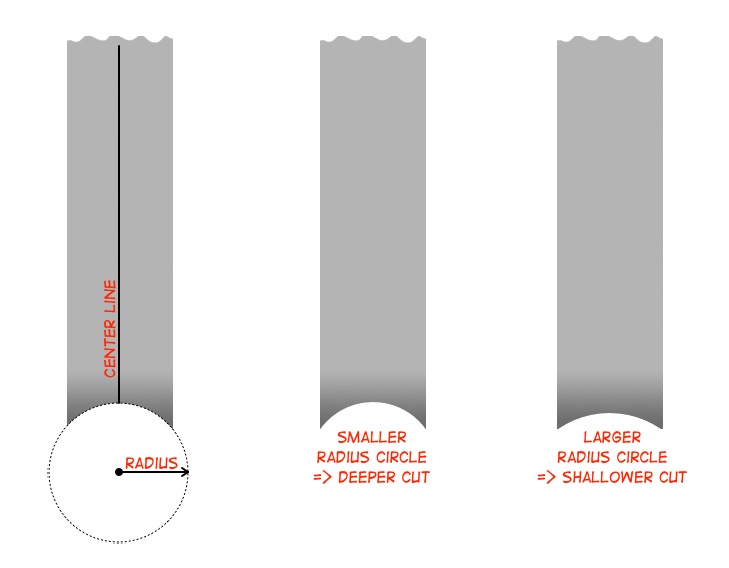
To create the hollow, take a circle with the desired radius, center it horizontally on the blade, then move it until the bottom corners of the blade just touch the circle at those two points. The arc between those points is the curve we want to cut into the blade:

Radius of Hollow

A larger radius means a larger circle, so the hollow that is cut out will be shallower. Conversely a smaller radius means a smaller circle, which leads to a deeper hollow.

Radius of Hollow (ROH) therefore refers to how deep a hollow is cut into the blade surface, and the value given represents the radius of the imaginary circle from which the hollow’s arc (curve) is taken.

ROH Drawn To Scale

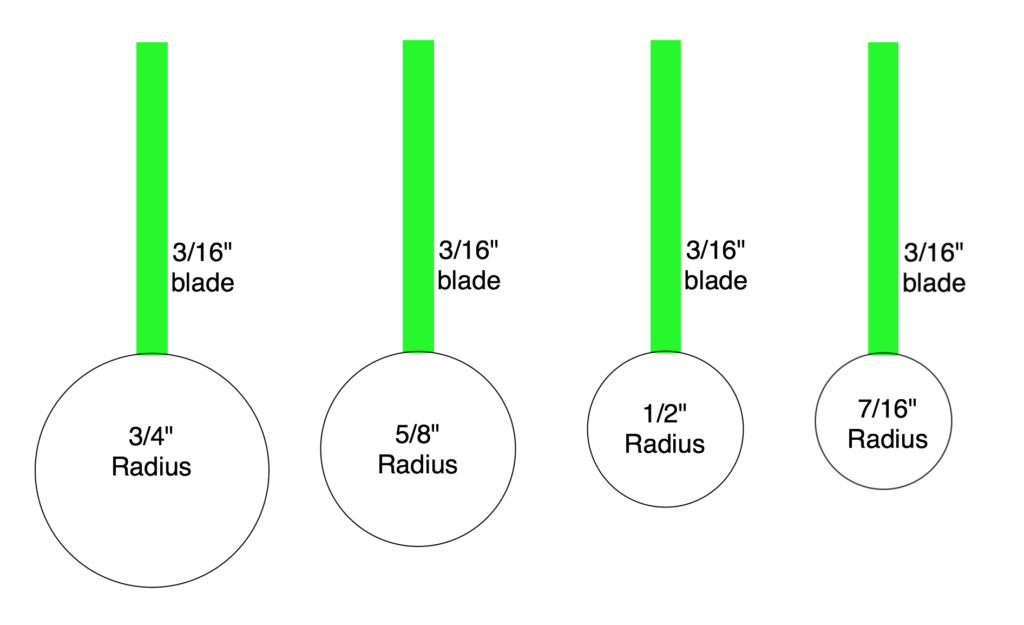
The images above show an exaggerated representation of the ROH on the blades in order that it’s more obvious what’s going on. Drawn at scale, here is a 3/16″ width blade (fairly typical) with four different ROH:

Radius of Hollow - To Scale

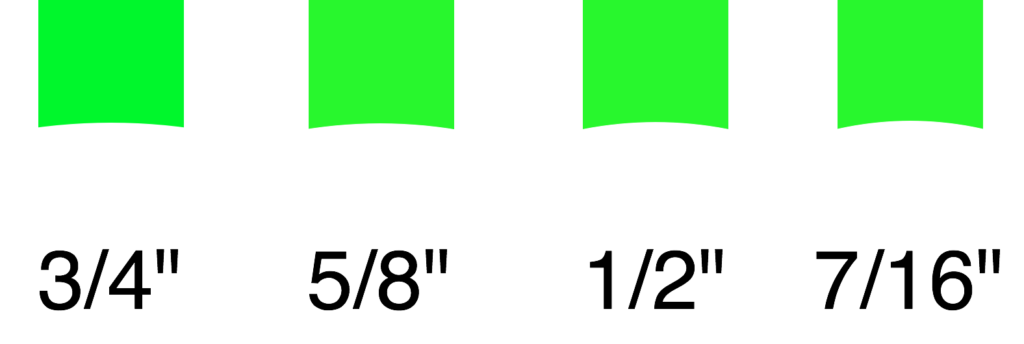
It’s a bit hard to see the difference, so here’s a close up of the same four ROH profiles:

Radius of Hollow - To Scale - Close Up

The difference is hopefully visible now, but looking at a skate blade I suspect I would be hard pressed to identify which ROH had been used!

Edges

The two sharp parts of the blade touching the ice are the edges. I’m going to state what’s probably obvious here and confirm that the sharp part on the outside of each foot is known as the outer edge and the one on the inside of each foot is the inner edge.

Misalignment

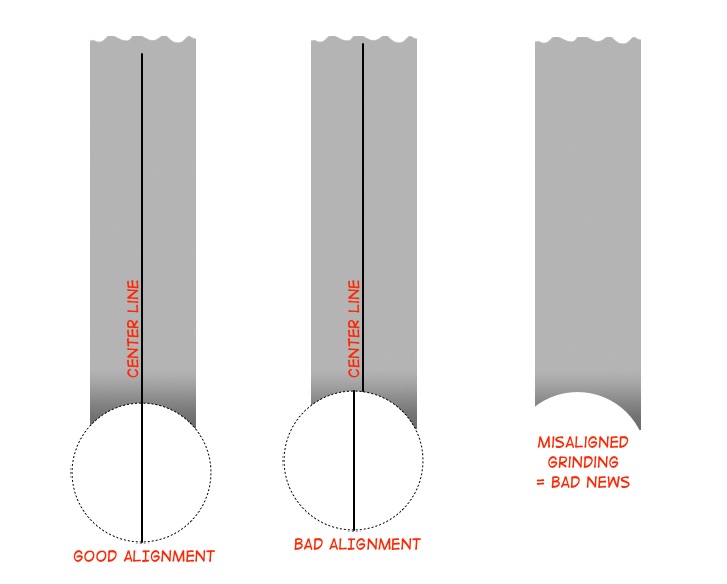
One reason to use a reputable skate technician to sharpen your skates is to ensure that they are capable of aligning the cutting tools very precisely. If the tool is off-center even by a small amount, the results can be anywhere from irritating to disastrous:

Misaligned ROH Grinding

Trying to skate on misaligned edges like those shown above would be virtually impossible.

What ROH Should I Use?

Choosing a ROH is a matter of personal preference and, sadly, trial and error. There’s not really a magic formula to determine which will be best for an individual, as a number of factors can influence that decision. A radius of hollow around 5/8″ is a fairly typical place to start, sitting roughly in the middle of the usual ROH range.

Typically, the better the skater, the larger ROH they will use. To that end, one way to determine the shallowest possible ROH for your skater would be to increase the ROH each time the skates are sharpened, and then when an ROH is reached where skating becomes too difficult, back off to the previous ROH. It’s not a hard and fast rule, but it’s a start.

Larger ROH (Shallower Hollow)

A larger Radius of Hollow (shallower / flatter hollow) gives slightly less control and less tight turns, because the edges cut into the ice less than a deeper hollow would do. On the up side, the flatter hollow glides well and can (subjectively) make the skater look a little more fluid on the ice as a result.

Smaller ROH (Deeper Hollow)

A smaller Radius of Hollow typically gives more control and tighter turns (because the deep hollow means that the edges cut into the ice more) and as a result the blades are more forgiving of the skater’s form, especially where landings are concerned. Small ROH means more bite, but also means the skates will glide less well, and it may take a bit more effort to skate as a result. One final point is that the marginally sharper edges with a deeper hollow mean that the blades can apparently be more prone to chipping.

Weight

Weight is a really important factor to take into account because it alters the effectiveness of the hollow quite significantly. Heavier skaters will need to use a larger ROH (i.e. a shallower hollow) because their additional weight will force the blades into the ice harder and allow them to cut in effectively despite a relatively shallow hollow. Cut a deep hollow on skates for a heavy skater and they may find that their weight pushes the edges into the ice so deeply that they can’t stop properly, trip over themselves or have difficulty turning. Too much ‘edge’ can be as bad as too little edge in this case.

A lighter skater in comparison will generally need a smaller ROH to get better control because they don’t push the skates down as hard and the extra depth creates more angular edges which will cut into the ice more effectively.

Ice Temperature

Believe it or not, the temperature of the ice also plays a part in the effectiveness of the ROH choice. Colder ice is firmer which prevents the edges from cutting in quite as much as they would on warmer ice; therefore a colder ice rink may require a deeper hollow on the blades (smaller ROH) to get similar bite to a larger ROH on a warmer rink. This is something a little more out of the skater’s control, unfortunately, but it’s worth knowing about nonetheless.