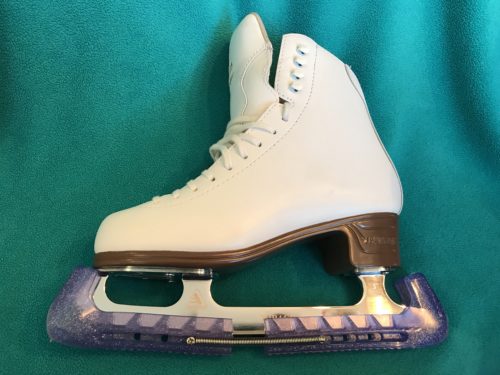
What Are Blade Guards?

Blade guards are plastic/rubber covers designed to protect the blades while off the ice. Ice skate blades may be made of steel, but the blades’ fine edges are susceptible to chipping and denting if used to walk around on hard or dirty (especially gritty) surfaces. Chips in the blade edges mean less control on the ice, and may require aggressive sharpening of the blades to remove them. The additional metal removed (more than in a regular sharpening) in turn reduces the lifespan of the blades, because let’s face it, there’s only so much metal you can remove before the toe picks are touching the ice.
How Much Are Blade Guards?
Blade guards are cheap enough that nobody should have ice skates without them. In the US, Amazon prices range from around $6 up to $15.
When Should I Use Blade Guards?
The general advice is that there are only two surfaces on which skates can or should be worn without guards:
- the ice
- rubber flooring
Therefore, blade guards should be worn when walking around in ice skates on any other surface except ice and rubber flooring.
The good news is that most ice rinks use rubber flooring in most key areas, so typically within the rink area you’ll be walking on rubber. The bad news is that even on the rubber surfaces, especially in the busier public areas, dirt accumulates. Grit and dirt from outside is carried in on shoes, and stepping on that—even on top of rubber—can dull or chip the blades.
The best advice therefore is that blade guards should be worn from when the skates are put on, right up to the edge of the ice. As a more general rule, the less you walk in skates off the ice, the better.
Are There Different Sizes?
Yes, because blades are different lengths, but the guards I’ve seen are one size fits all
and either have an adjustable locking mechanism, or can be cut to size to fit the blade. There are two main types I typically see:
Latch Type

This type of guard is probably fastest to set up, and probably even fastest to put on and take off, although they are not my own preferred guard. Usage is simple: put the front of the blade in the front end, then clip the latch over the back of the blade. The latch can be easily and quickly moved as needed for the length of blade. Note that there are both figure skate and hockey skate variants of these guards, so make sure you are buying the right kind!
Spring Type

For the skater wishing to express their own style, the spring-type blade guards come in a wide variety of colors and styles including solid colors, translucent with glitter and even colors that change with temperature. Each guard is made up of two pieces, with two springs holding them together in the middle. Fitting these to a blade requires a little bit more effort than the latch type. The blade size is checked, it is matched up with an (included) chart, then each of the four pieces comprising the pair of guards is cut to the appropriate length. Then the springs are screwed in to place. There aren’t any instructions on how to do this, so I will demonstrate this below. It’s of note that while all the pictures show the blade guards meeting perfectly in the middle, this is really not how they end up looking in most cases, because of the variable gaps depending on blade length.
To use the guards, put the toe pick in one end of the guard, then pull back on the rear end of the guard to stretch the spring so that it will go over the back of the blade. The springs hold the guard tightly in place. Initially these guards can be a little tight on the blade, but they loosen up fairly quickly.
Fitting The Springs
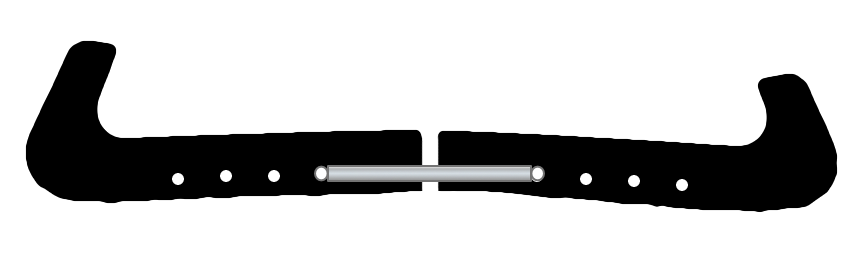
Once the two halves of each blade guard have been cut to length, butt the two cut ends together and hold up the springs next to them to find the most appropriate holes through which to mount the springs. Depending on where the guards were cut, it may be necessary either to put a gap in between the two halves, or (if you are feeling brave) to very slightly stretch the spring in order to reach the nearest hole:
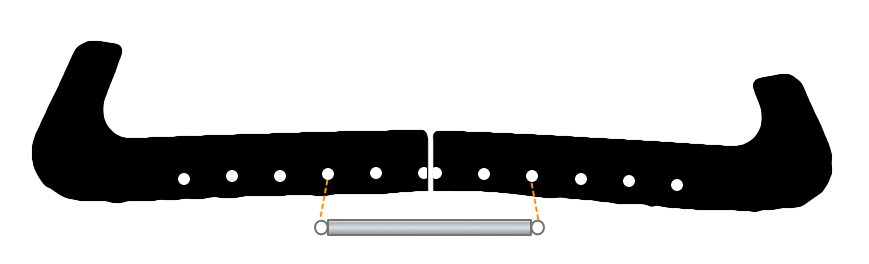
In this case, the holes are very slightly close together than the length of the spring, so the two halves are separated a little in order to align the rings on the end of the springs with the holes.
The springs, confusingly, come with only one screw each. This is because each screw will assist in securing two springs, as shown below. One screw should be used on each side; when it gets through to the other side, position the ring from the other spring and keep screwing it in so that it locks into that other ring. Looking from above, the screws go in like this:

Here’s how it looks from the side, with a real blade guard. Note that you see a screw head on the left, but on the right you see the end of the screw coming through from the other side, holding the other end of the spring in place. The other side looks just the same, as you would expect:

When Shouldn’t I Use Blade Guards?
- For any extended period of time off the ice, it’s better to take the skates off and walk around in shoes rather than in skates.
- Blade guards should never be left on the blades once the skates are taken off. The plastic/rubber can allow moisture to collect, and having water in contact with the skates in between skating sessions can cause rust to the blade and, if you have cork/leather soles on your skates, rot to the soles and heel.
Blade guards get put on when the skates get put on, and taken off when the skates are taken off.
Additional Tips
Put Your Name On Them
At the very least, I’d suggest using a Sharpie to put your initials somewhere on the blade guards. There are only a few common types of guards that I see regularly, and that means lots of duplication between skaters.
Clean Them!
Dirt and grit can get inside the blade guards, and walking on guards with grit inside can also cause damage to the blades. To that end, I suggest cleaning them out regularly to keep the insides as clean as possible. You can’t avoid all damage to blades (even on the ice), but minimizing risk will help keep the blades in good condition for as long as possible.